Have you always wanted to give photoshop a try but didn’t know where to start? Now, is your chance to discover some of the fundamental tricks and guidelines to follow to get you started.
Guideline: Always Work Using Multiple Layers
No matter what you are doing, always create a new layer before you begin to edit. By using layers, you can see what your picture or design looks like before and after each layer was added. Working on one layer can be destructive. If for example, after a half hour of working you decide you’re unsatisfied with how the outcome of your project is looking, you might be able to use the undo tool to get back to where you want but that isn’t always the case. This is where working on multiple layers comes in handy. Simply delete the layers you no longer require and continue.
Pro tip: Before you hit the delete button on the layers you think you don’t want, click and unclick the eye symbol next to the layer to see what the picture looked like before and after the edit.
Guideline: Name Your Layers
Instinct is going to tell you to ignore this rule but trust me, you will thank me later. After you have been working on a file for a long period of time, there is a good chance you will end up with more layers than you can count. Naming your layers makes it easy to find specific layers later. To name a layer, double click the layer where the current layer name is, and a text box will appear for you to type in. When you are satisfied with the name, click the ‘enter’ key on your keyboard.
Trick: Photo Editing Using Adjustments
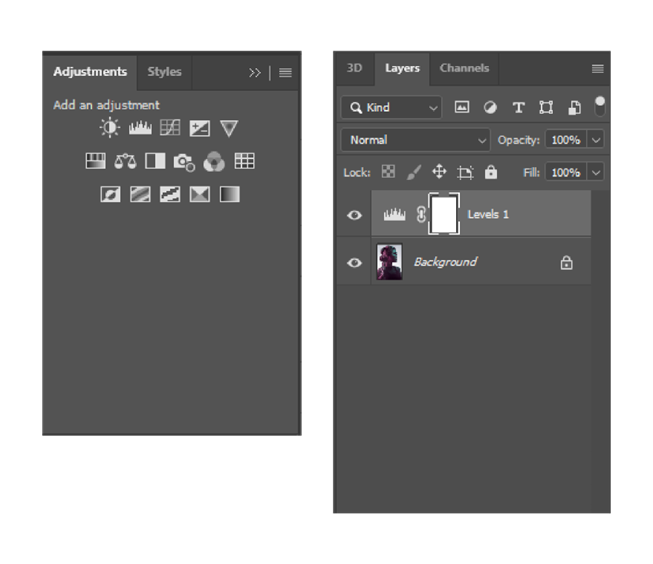
One of the simplest ways to edit a photo quickly is to use the adjustments panel. In the adjustments panel, you will find sixteen options to adjust various things such as brightness/contrast, levels, curves, exposure, and more. When using the adjustments panel, it automatically creates a new layer for you to go back and adjust if you are unhappy with the results. The quickest way to learn how each adjustment affects your photo is by clicking each one and adjusting the levels.
Pro tip: Just like in the tools panel, if you hover over the icons in the adjustments panel, photoshop will tell you which adjustment you are about to make.

Trick: Changing the Background of a Photo
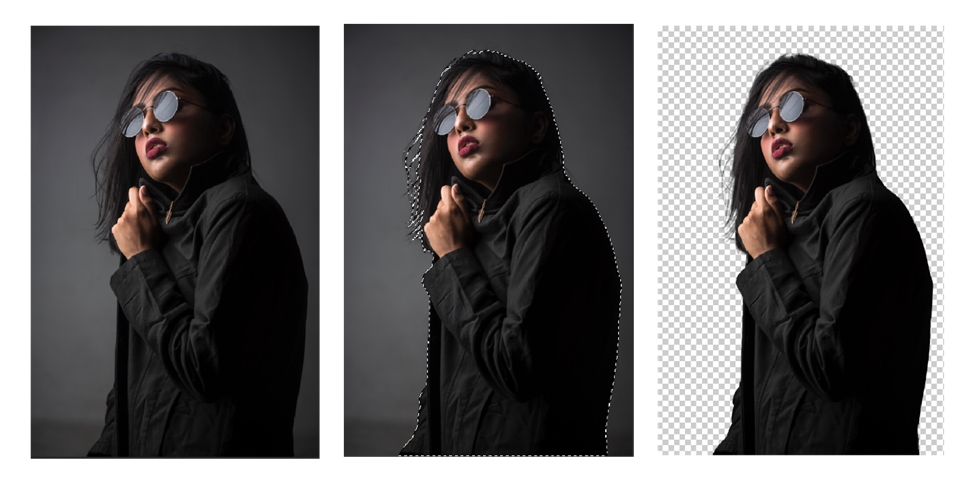
Ever wondered how people can take out the background of a photo and replace it with something unique? Now, you will be able to do just that. On the left-hand side, in the tool panel, select the “Quick Selection Tool”. To increase the brush size, use the ] key on your keyboard and to decrease the brush size use the [ key. On the left-hand side, on the tools panel, select the Quick Selection Tool. It looks like a paintbrush with a dotted line around the tip.
Pro tip: If you aren’t sure if you are selecting the proper tool from the tool panel, simply hover over each icon with your mouse and photoshop will provide you with the name of the tool and brief description of the tool’s capabilities.
Click and drag the Quick Selection Tool to select the area you want on a new background. If you accidentally select a part of the picture, you don’t want selected, hold down alt/option and click and drag to deselect.
Pro tip: Zoom in using command/ctrl + + and then hold down the space bar to move your picture around to get a better look at what you are selecting. Zoom out using command/ctrl + - .
Once you are satisfied with your selection, go to the top of your screen, and click the box labeled “Select and Mask”. On the right side of your screen, at the very bottom, you will see “Output to” and drop-down menu. From the drop-down menu, select “New Layer with Layer Mask”. This places your selection on a new layer and on a transparent background.

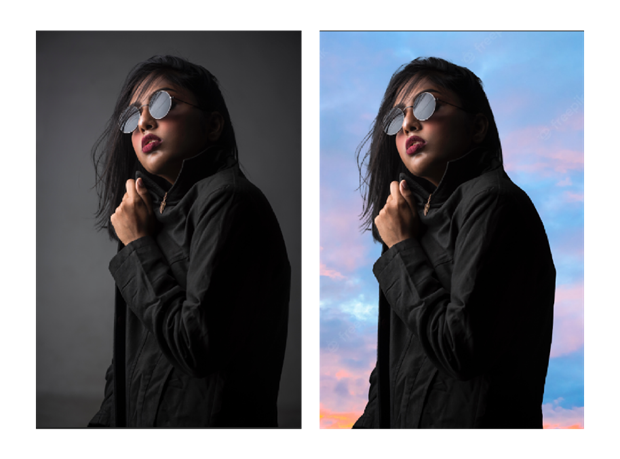
Open any picture of your choosing for your new background. Click and drag the new background into your photoshop document. When you do this, naturally the new background will come in on top of the other picture. To fix this, in the layers panel on the right-hand side click and drag the background layer downwards until a blue line appears and then release.

Ta Da! You have successfully created a new picture with a more interesting background.

Trick: Getting Rid of Skin Imperfections
As a photographer, one of the most frequent complaints from clients is skin imperfections such as acne, aging spots, and/or wrinkles. Thankfully, there is a simple solution that will resolve this issue nine times out of ten. Using the Spot Healing Brush Tool (found on the left side of the screen in the tools panel (it looks like a band-aid)) you click and drag over the spots you want to clear up. To change the size of the brush, use the key [ to make the brush smaller and ] to increase the size of the brush.
Pro tip: use short quick short strokes. Don’t attempt to cover a large area at one time.

Trick: Creating Color Overlays
A quick and effortless way to add a unique effect to your pictures is to use a color overlay. Start by opening any picture. Then on the left-hand side of your screen in the tools panel click the rectangle tool. Click and drag to create a box. Don’t worry about making it perfect, you can adjust it later. When you have created a box, when you hover over the sides of the box, you can click and drag the sides to cover the entire photo. To change the color of the box, look to the right-hand side in your layers panel. Double click on the box containing the color and, in the pop, up menu chose a new color and click okay. Then, right above the layers panel there is a drop-down menu that says “normal”. Click it and hover each option to see how they affect the picture. In this example, I chose the option called, “saturation”.

Trick: Matching the Color of One Picture to Another
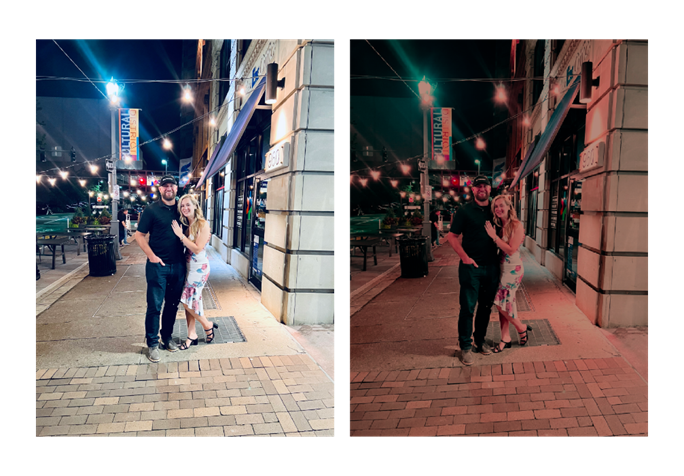
To begin this process, you will need to open two pictures. Open the picture you want to change and the picture you want to match the coloring of. Both must be open for this process to work. Below on the left, is the picture I want to edit. On the right is the picture I want to mimic the coloring of.

Open the picture you want to edit and go to the very top of your screen and click, “Image”. Under the drop-down menu, hover over “adjustments”. From the sub drop-down menu, select "Match color”. At the bottom of the pop-up menu where it says, “source”, chose the file that you want to mimic the color of and click okay.

Instantly, you will see the effect of the color matching just like the example below.

Guideline: Always Save a New File
The last thing I want you to remember is never ever save over the original photo…never. The instant you open a photo to edit, save the photoshop file. And the instant you are finished editing a photo, save the file as something like “photo edits”. If you ever decide to go back and make more changes, when you open the photoshop file, save it as something new. This way, if the changes you make look horrible, you still have the previous version.
Good luck and go for it!


Comments